Go to the dashboard
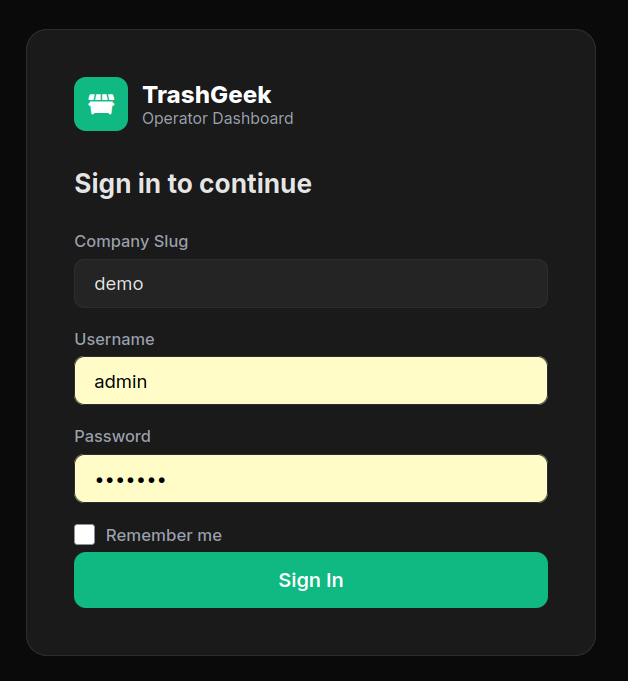
Open map.html in your browser. You'll see the login screen. Enter your company slug, username, and password.
Explore the Home page
After logging in, you land on the Home page. It shows four stat cards: active rentals, revenue this month, overdue pickups, and pending quotes.
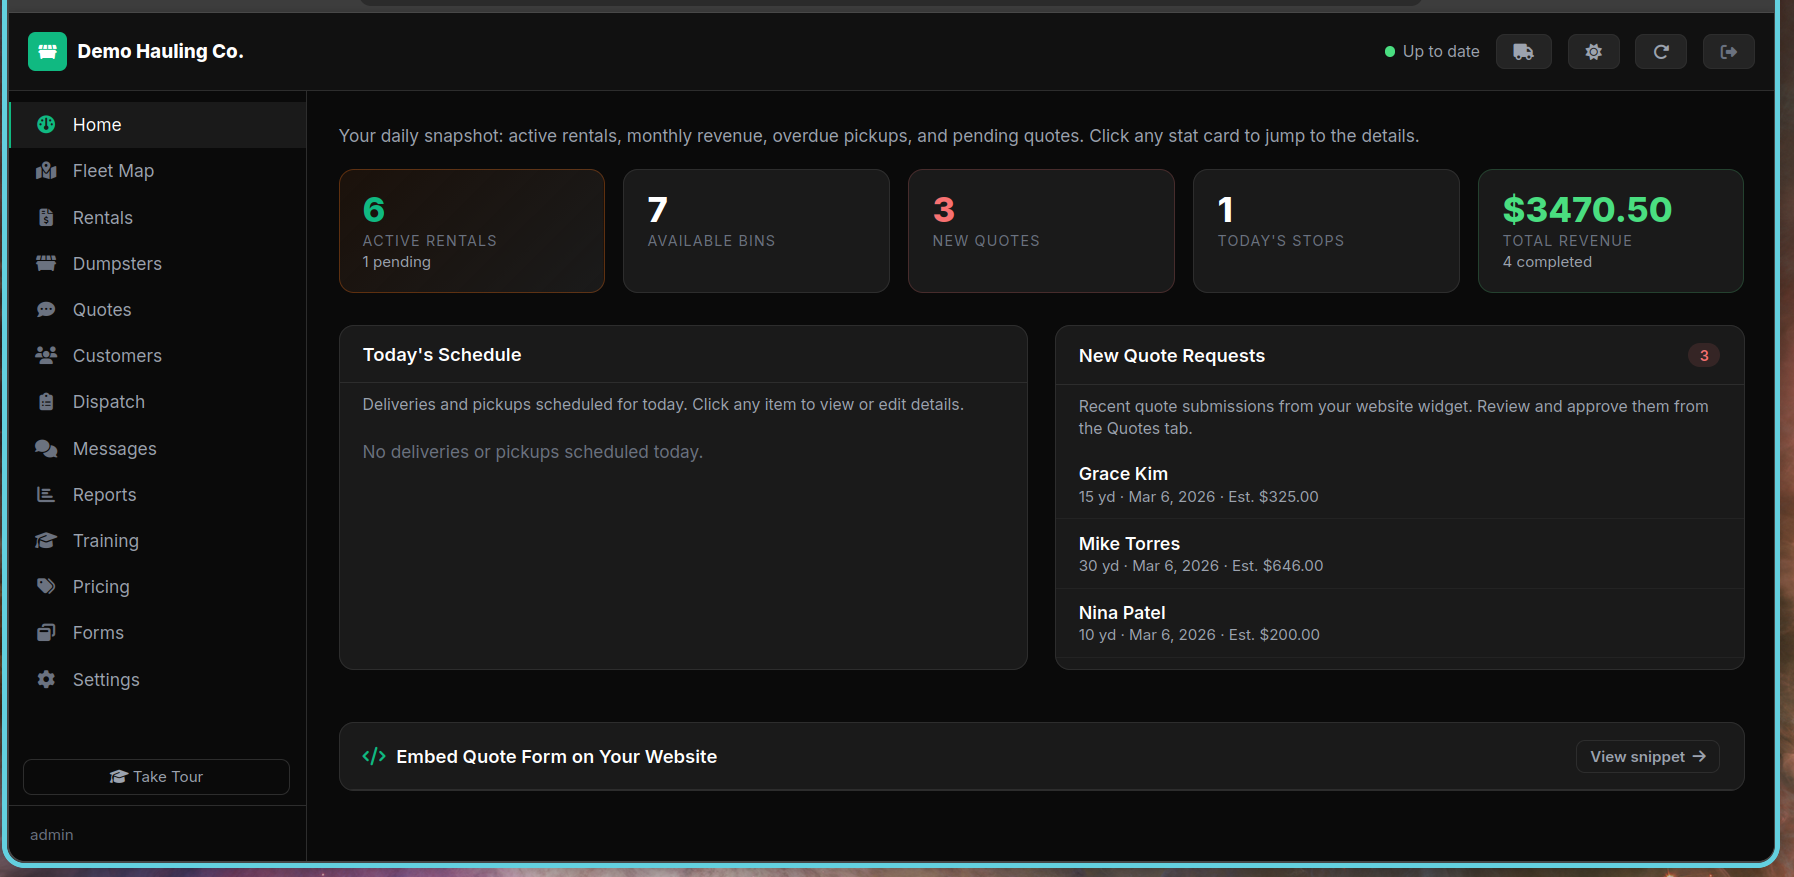
Take the guided tour
Click the Take Tour button at the bottom of the left sidebar to walk through each section of the dashboard.
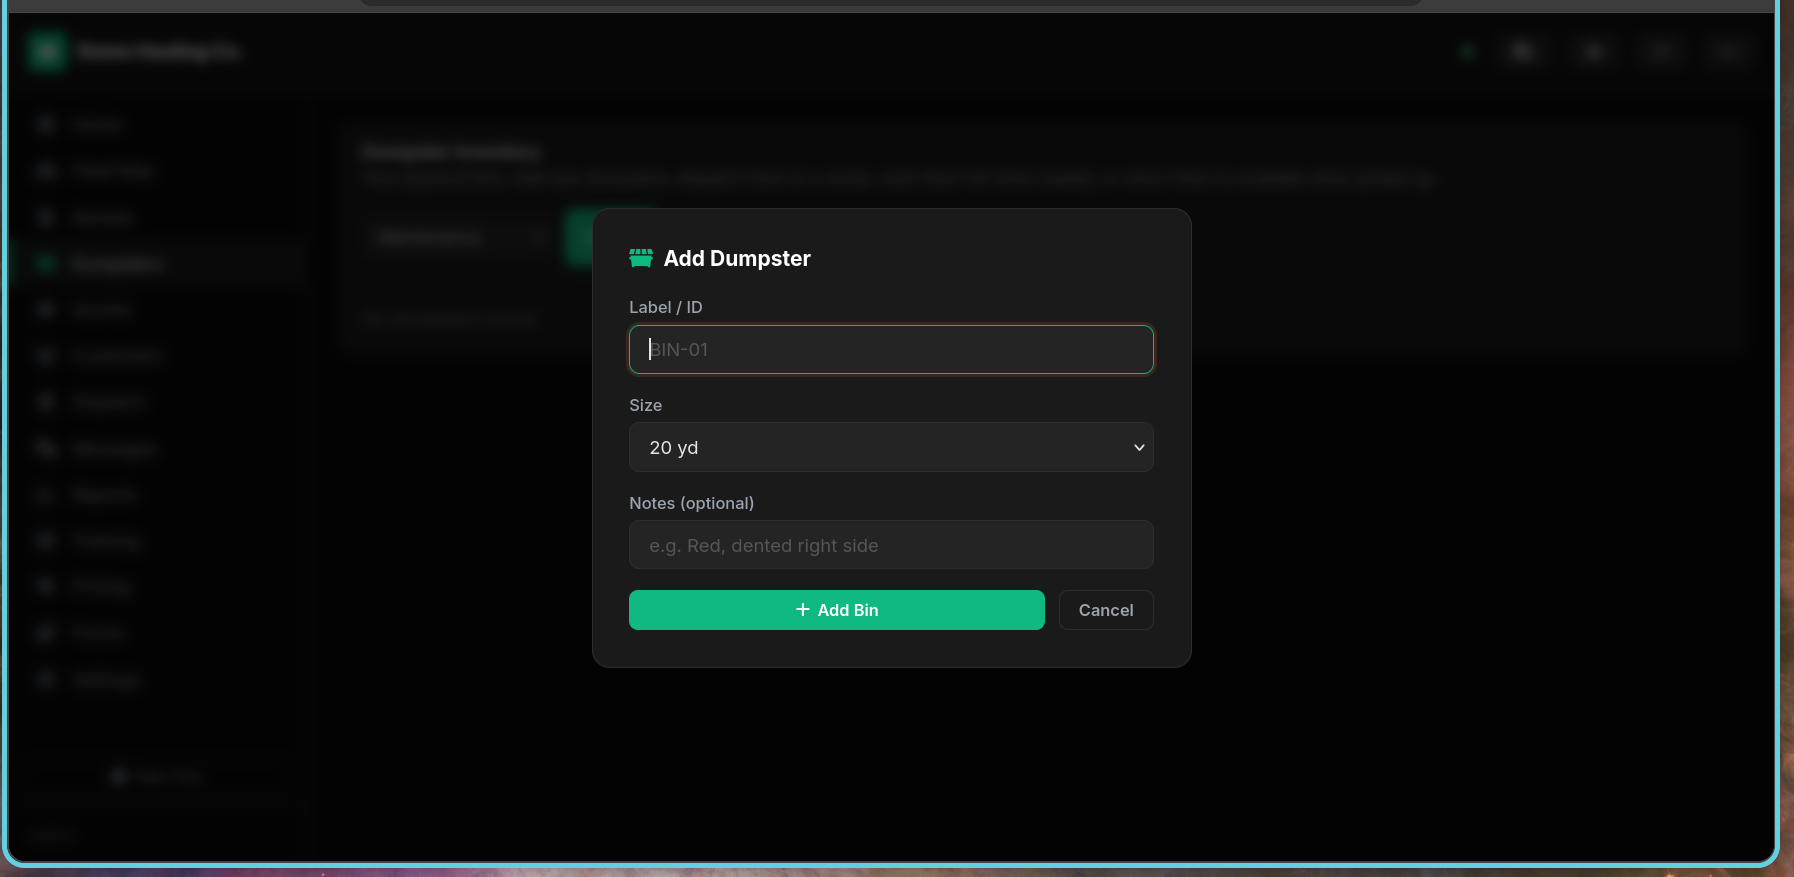
Go to the Dumpsters page
Click Dumpsters in the left sidebar. You'll see an empty list if this is a new account.

Click "Add Bin"
Enter a label (e.g. "BIN-001"), select the size in yards (10, 15, 20, 30, or 40), and add any notes. Click Save. Pricing for each size comes from your rate sheet on the Pricing tab — you don't need to set prices per dumpster.
Repeat for each dumpster
Add all dumpsters in your fleet. They'll show as "Available" until dispatched to a rental. Your plan limits how many bins you can add (Pickup: 5, Hauler: 50, Fleet: unlimited). Hauler and Fleet plans also unlock advanced features like email campaigns, auto-invoicing, seasonal pricing, webhooks, and automated workflows.
Open the Add Equipment modal
Go to the Dumpsters page and click Add Bin. The modal now includes a Type selector at the top. Choose between Roll-Off Dumpster (the default) or Dump Trailer.
Enter trailer details
When you select Dump Trailer, additional fields appear: trailer size, weight capacity, vehicle registration number, VIN, and local registration number. Fill these in to keep your fleet records complete.
Add insurance information
Each trailer has insurance tracking fields: insurance provider, policy number, and expiry date. When insurance is nearing expiry (within 30 days), the trailer card shows a yellow warning badge. Expired insurance shows a red badge so you never miss a renewal.
Filter and dispatch trailers
Use the equipment type filter on the Dumpsters page to show only trailers or only dumpsters. Trailers dispatch and return just like dumpsters — assign them to rentals, schedule deliveries, and mark them as returned through the same workflow.
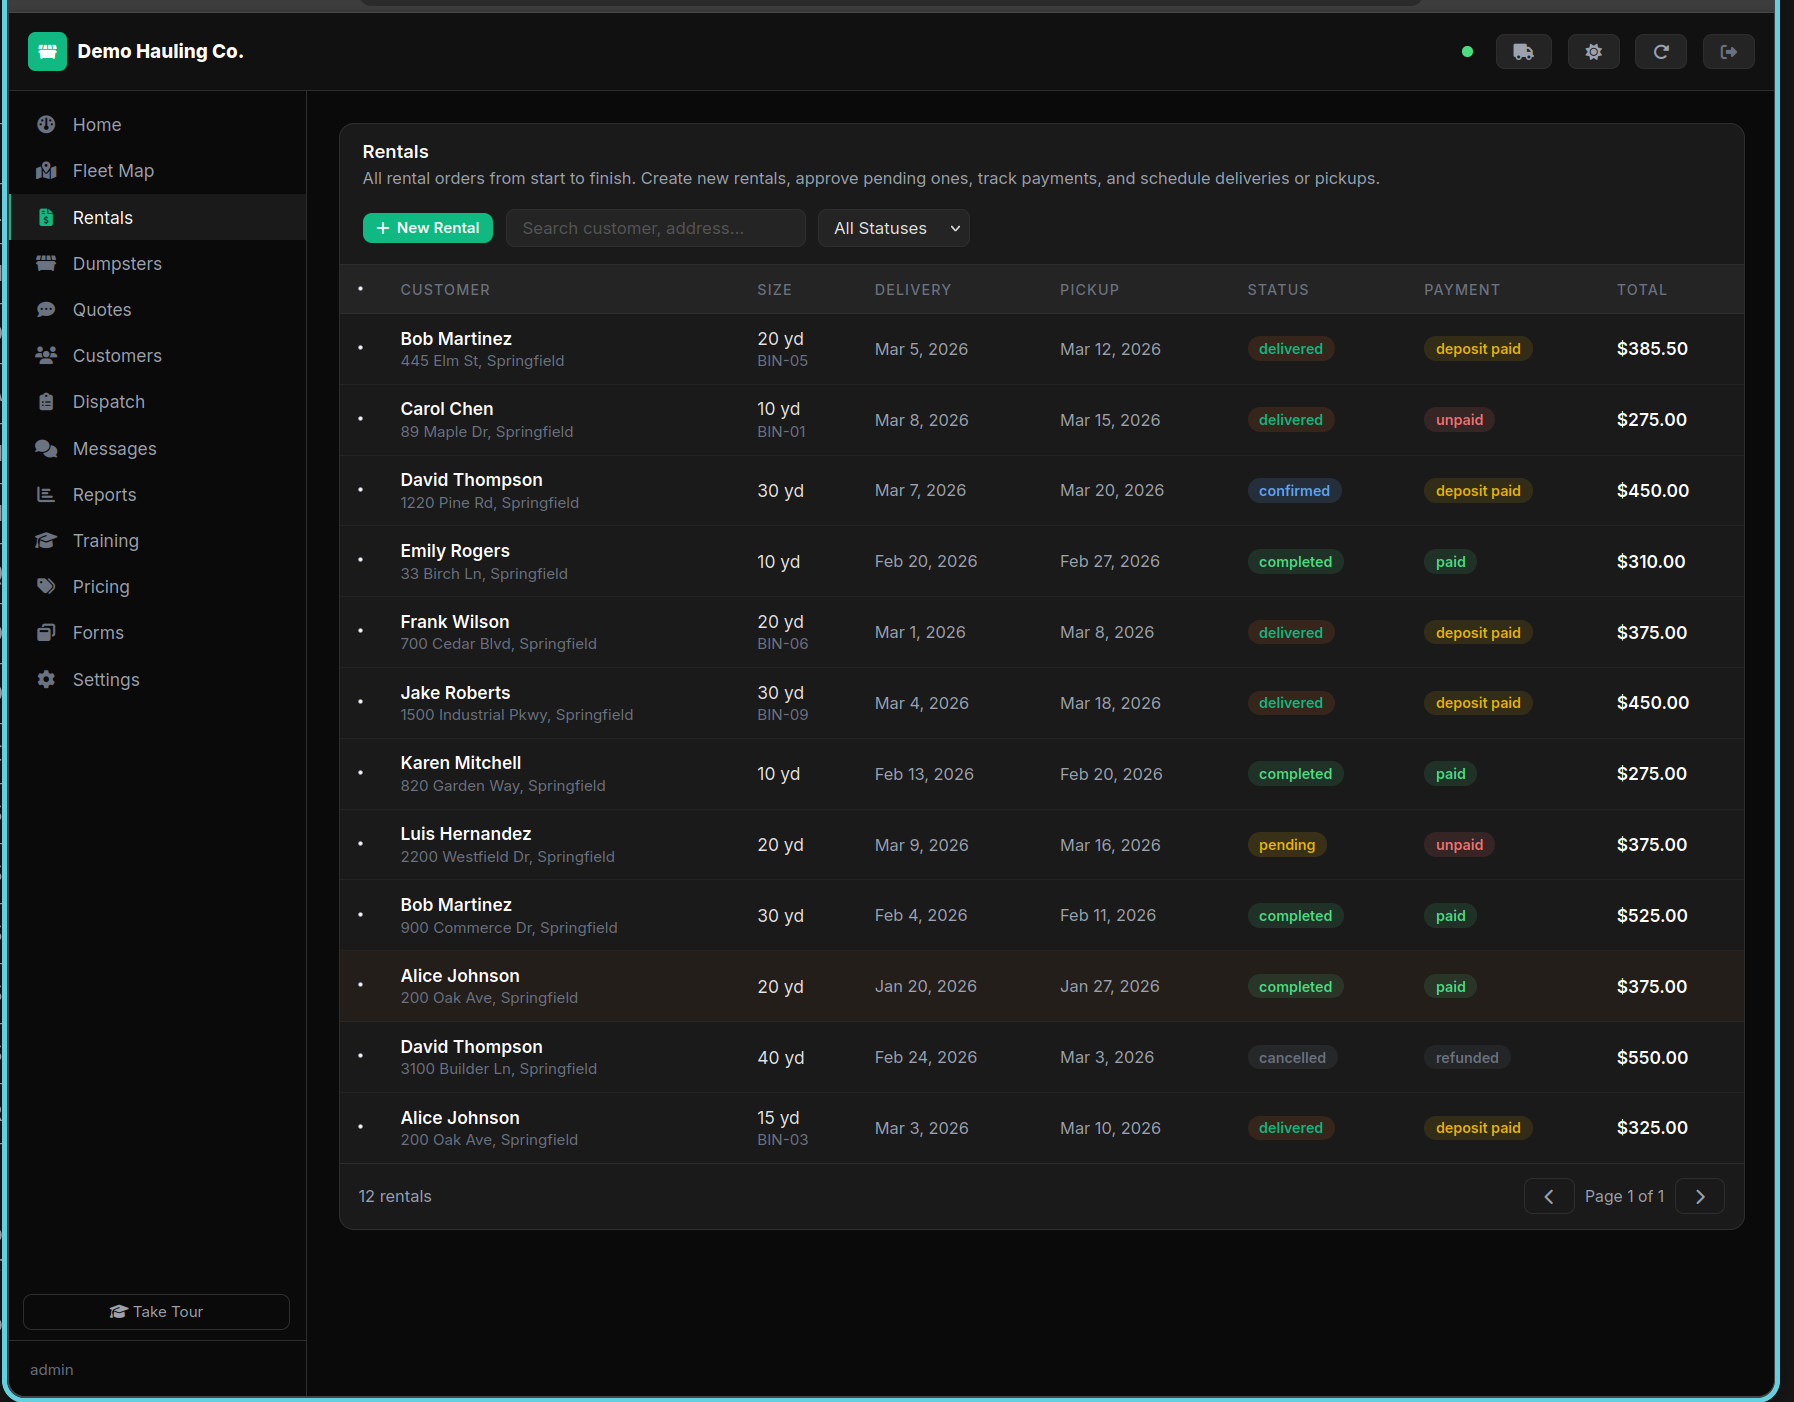
Go to Rentals and click "New Rental"
Fill in the customer details: name, phone, email, service address. Select a dumpster size and an available bin from the dropdown.
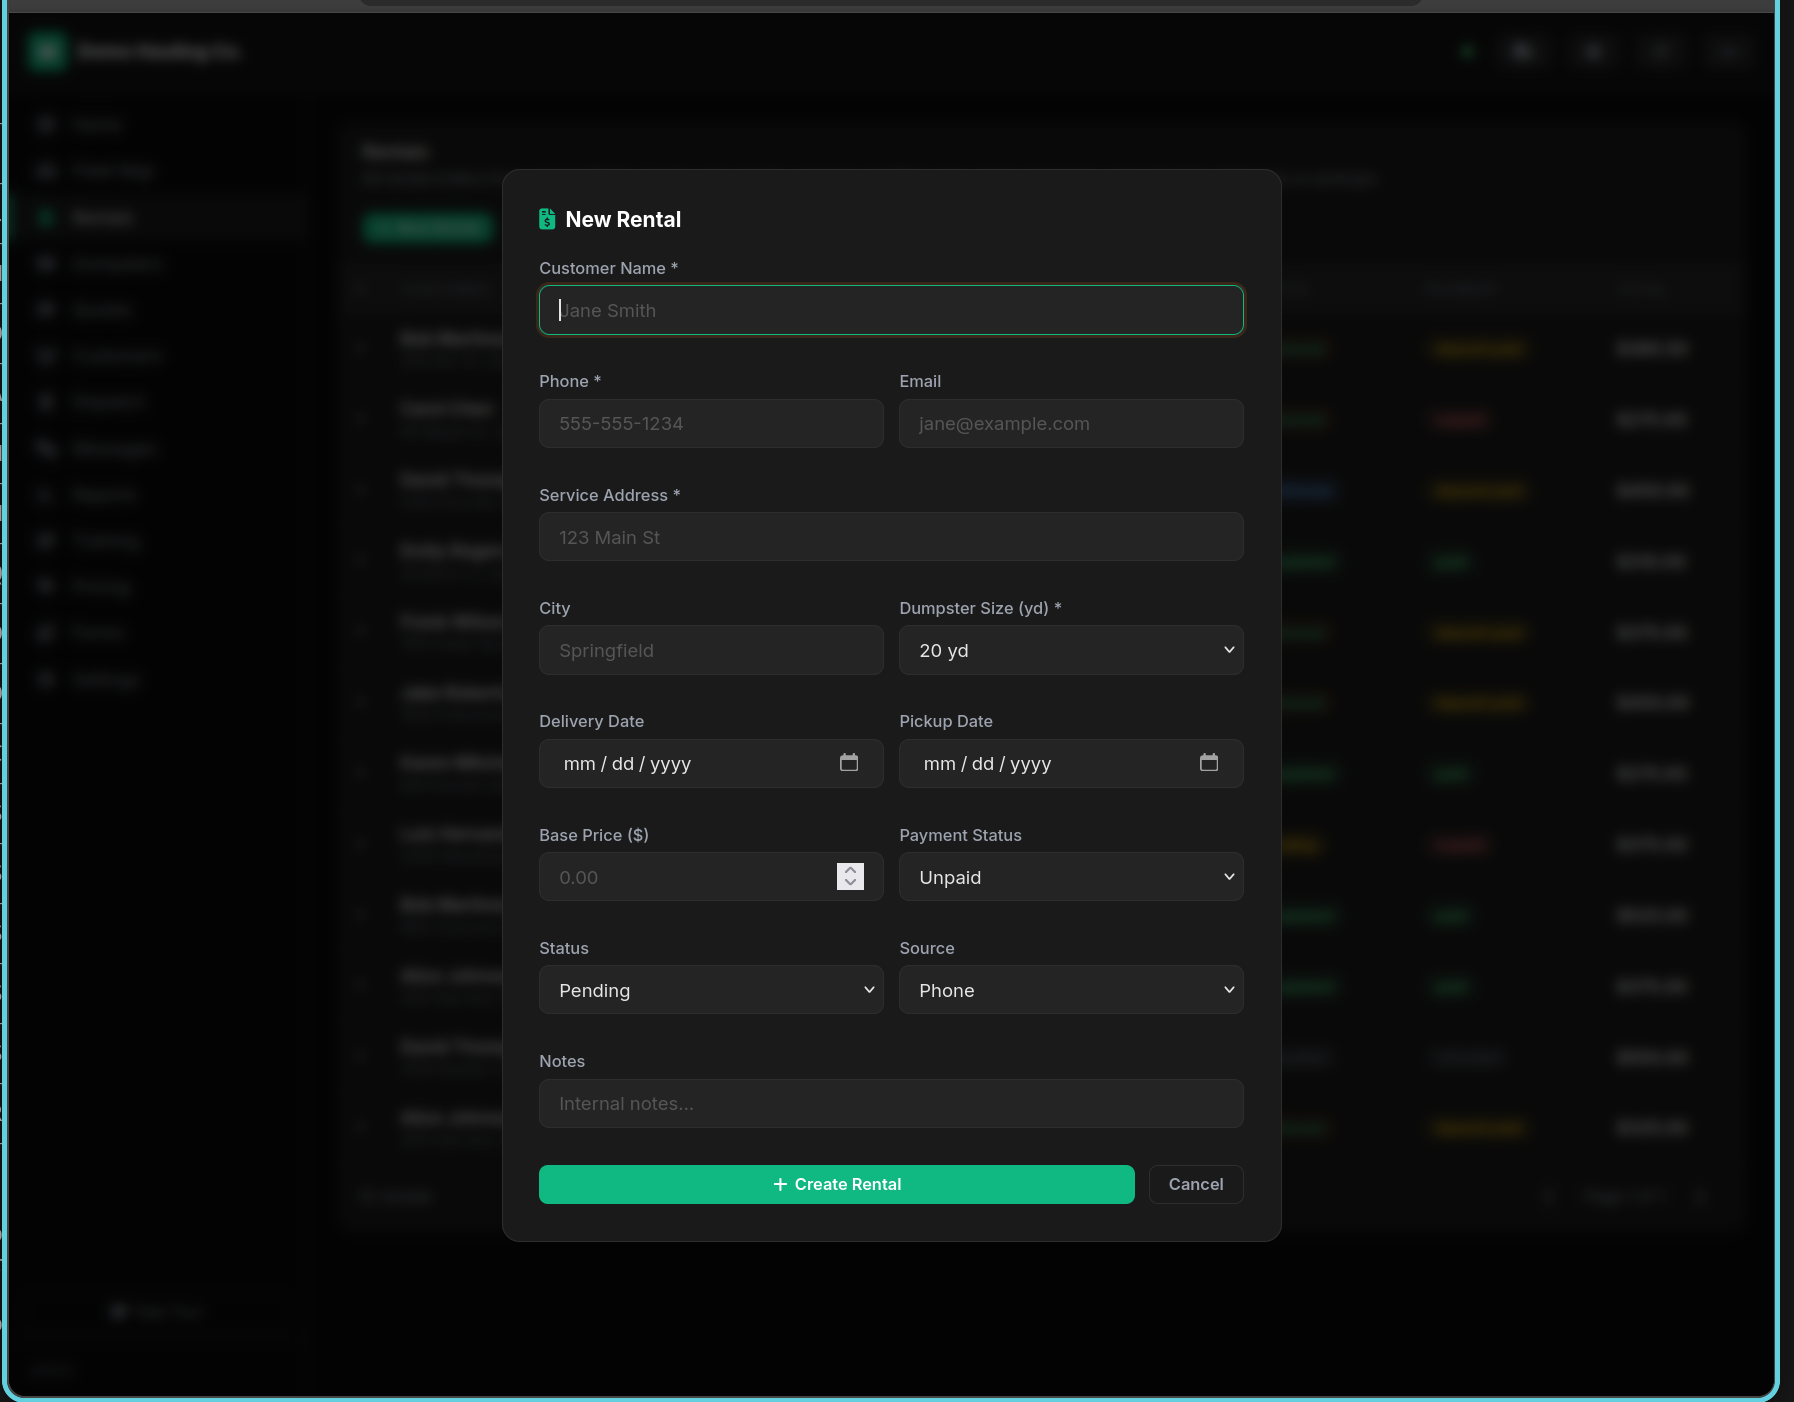
Set dates and pricing
Pick delivery and pickup dates. The price auto-calculates based on your rate sheet. Adjust the total if needed, then click Create Rental.
View on the fleet map
Switch to the Fleet Map page. Your new rental appears as a marker at the delivery address. Click it to see details or mark it as delivered.
Register your company
Sign up for a new company account on TrashGeek. You'll receive a confirmation screen telling you to check your email.
Check your email
Open the verification email from TrashGeek. Click the Verify Email Address button to activate your account.
Account activated
After verification, your account is fully activated. Sign in to the dashboard with your credentials and start setting up your fleet.
Check the Quotes page
New quotes from your website widget appear here with status "New". You'll also get an email alert and a Matrix notification.
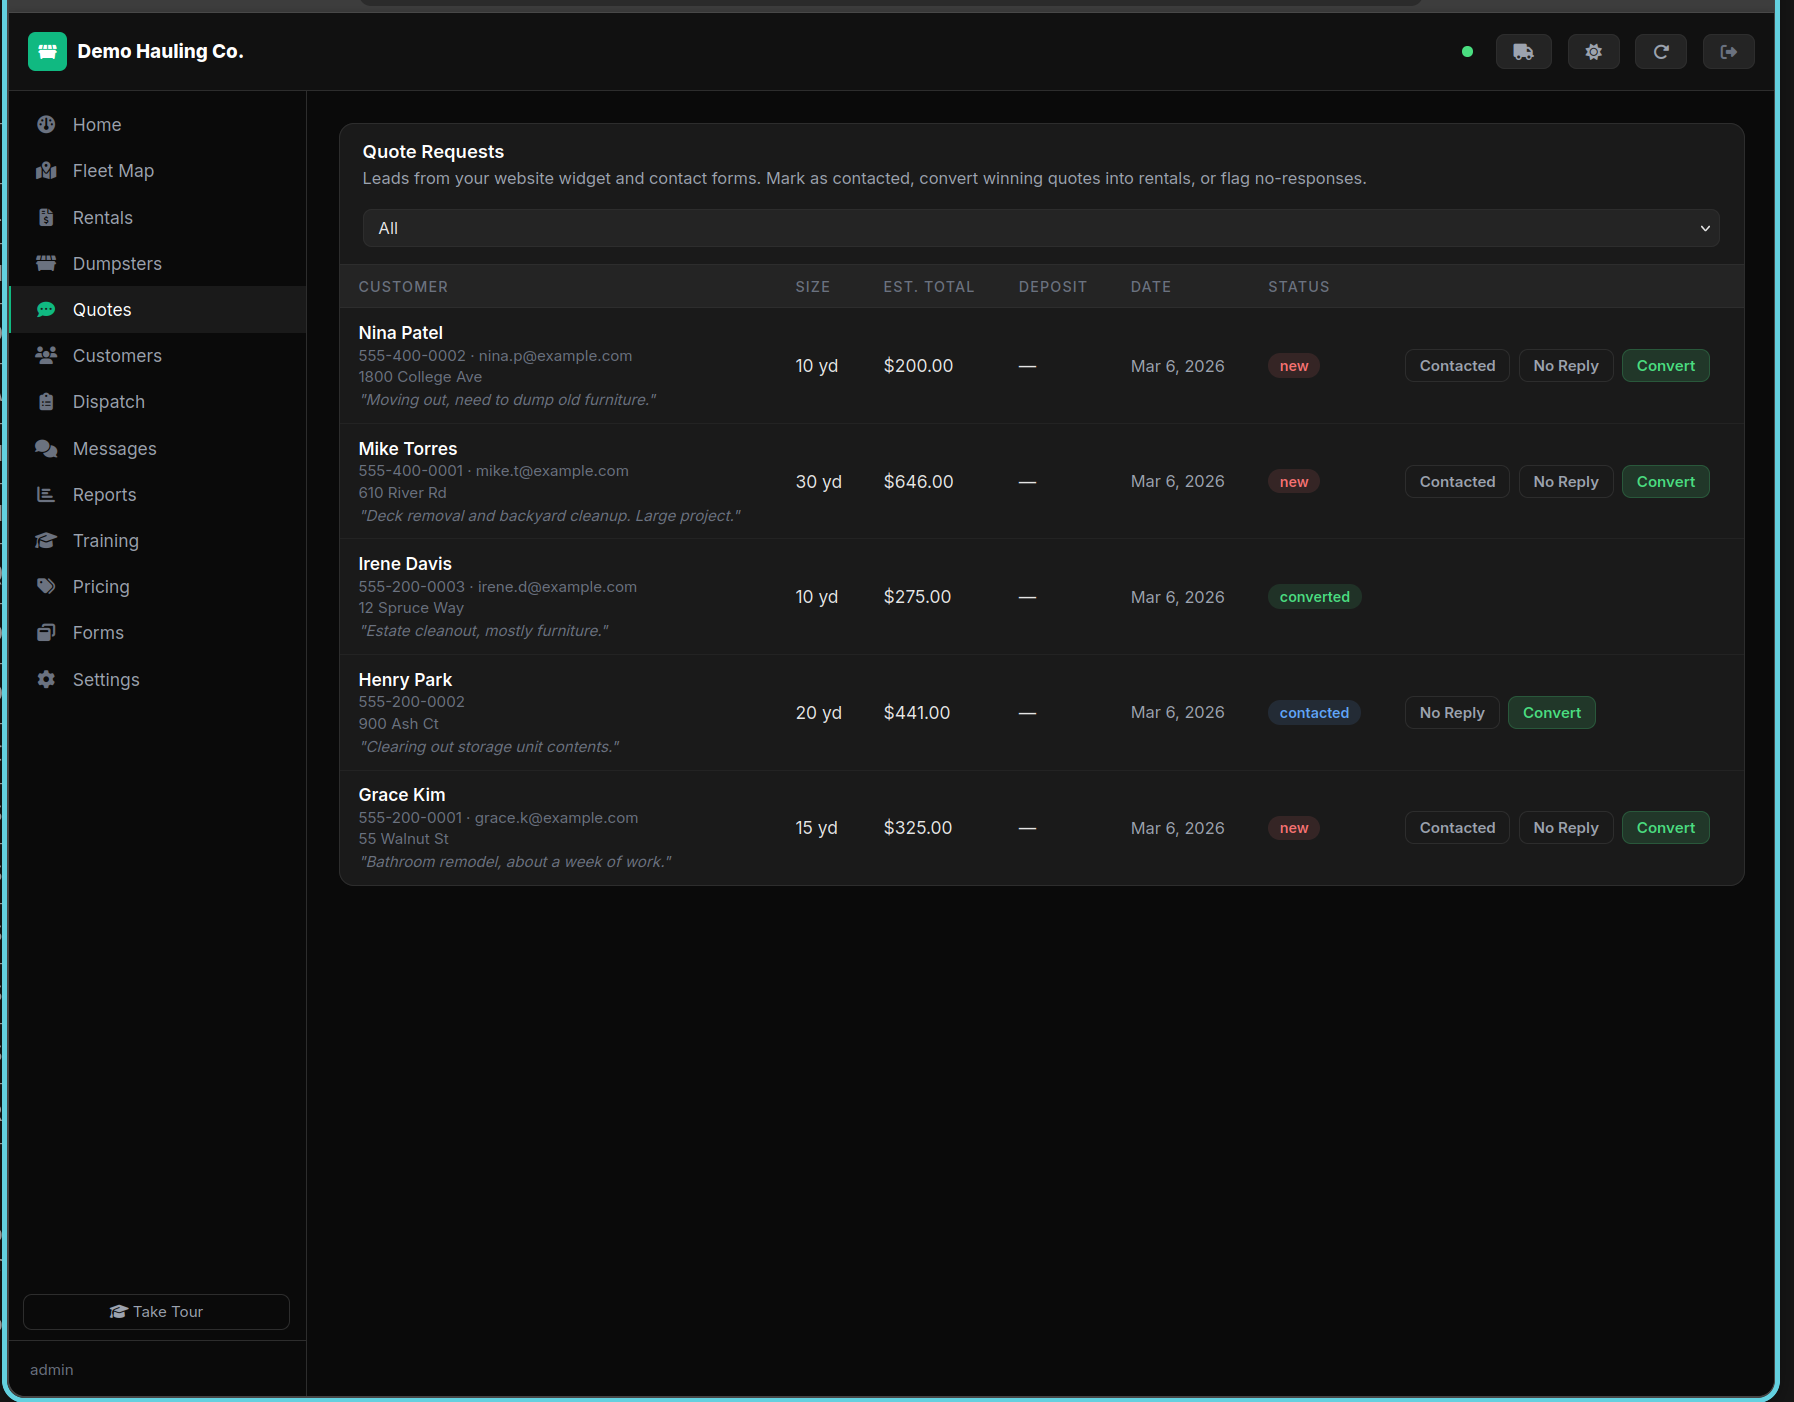
Review and contact the customer
Click a quote to see the details. Update the status to "Contacted" after reaching out. The customer's phone number is clickable to dial directly.
Convert to a rental
Click Convert to Rental. All customer info, size, and pricing carry over automatically. Adjust dates if needed, then save.
Open the Dispatch page
The dispatch board shows appointments in columns: Scheduled, En Route, Completed, Cancelled. Today's appointments are shown by default.
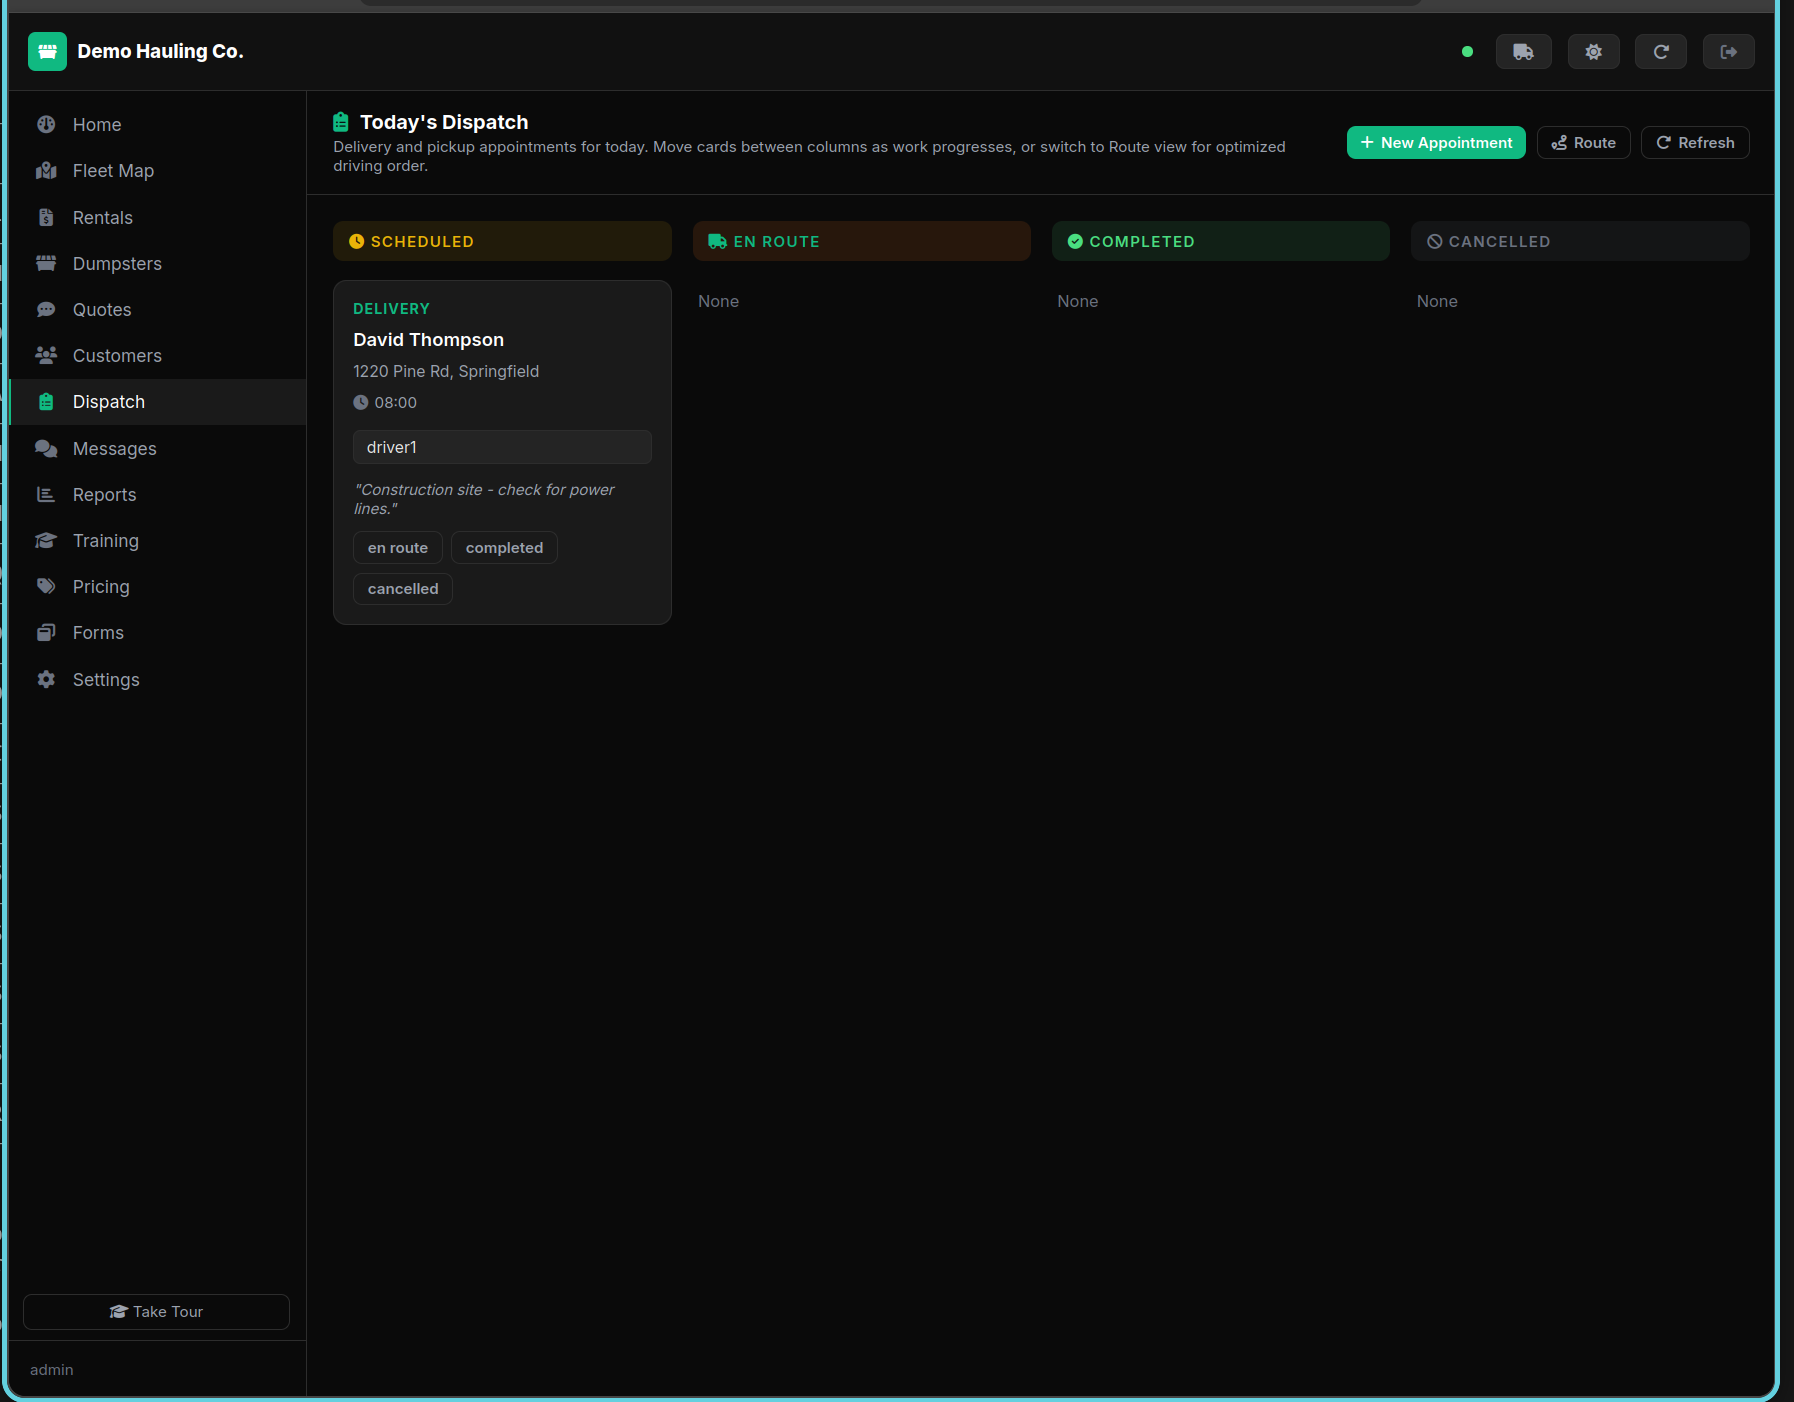
Create an appointment
Click New Appointment to schedule a delivery or pickup. Select the rental, date, time, and assign a driver.
Auto-scheduled pickups
You don't need to manually schedule every pickup. When a rental's preferred pickup date is tomorrow, the system automatically marks the dumpster as full and creates a pickup appointment on the dispatch board. This runs every day at 7 AM.
Track in real time
When drivers use the Driver App, appointments move across the board automatically via Socket.io. You can also subscribe to an iCal feed from Settings.
Open the Dispatch page
Click Dispatch in the left sidebar. The board displays four columns: Scheduled, En Route, On Site, and Completed. Today's appointments load by default.
Drag appointments between columns
Click and hold any appointment card, then drag it to a different status column. For example, drag a card from Scheduled to En Route when a driver departs. The status updates in real time for everyone, including the driver's mobile app.
View live driver locations
Click the Map toggle on the dispatch page to see driver positions overlaid on the fleet map. Active drivers with GPS enabled show as moving markers. Their last-known position and heading update every few seconds via Socket.io.
Use filters and date navigation
Use the date picker to view past or future appointments. Filter by driver, appointment type (delivery/pickup), or status to focus on what matters. The board reflects filters instantly.
Open driver.html on a phone
Drivers log in with their company slug and credentials. They see today's assigned stops in a card layout optimized for mobile.
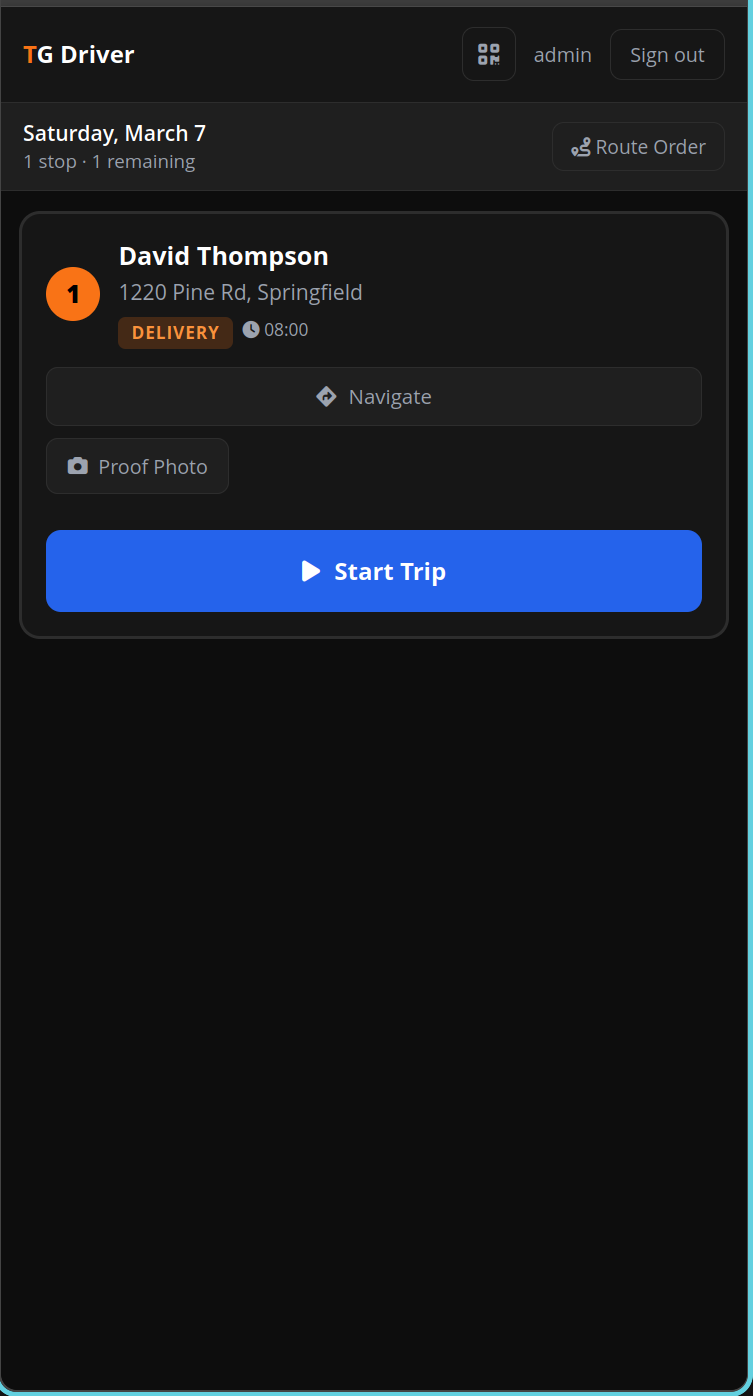
Start a trip and navigate
Tap Start Trip to begin GPS tracking. Tap the address to open Google Maps for turn-by-turn navigation. The trip records mileage automatically.
Complete the stop
Tap Mark Dropped Off or Mark Picked Up to complete the appointment. Upload a proof-of-delivery photo if required.
Open stop card
In the Driver App, tap the stop you're working on to open its detail card.
Tap "Report Damage"
On the stop card, tap the Report Damage button to open the damage report form.
Fill in damage details
Enter a description of the damage (required). Select a severity level: Minor, Moderate, or Major. Enter a repair cost estimate in dollars.
Attach photos and submit
Take or upload photos of the damage for documentation. Tap Submit to file the report. The office team is notified immediately.
View the stop card
In the Driver App, tap the stop you want to update to open its detail card.
Add or edit notes
Tap Add Notes or Edit Notes. Enter gate codes, access instructions, or any special directions for the stop. Tap Save.
Mark a stop as missed or cancelled
If you can't complete a stop, tap Missed or Cancelled and confirm. The office team is notified so they can reschedule.
Understanding the GPS status indicator
In the Driver App, a colored dot appears next to the GPS icon in the header. Green means a strong, recent fix (updated within 15 seconds). Yellow means the signal is stale or weak (15–60 seconds old). Red means GPS is unavailable or permission was denied.
Continuous tracking during trips
When a driver taps Start Trip, the app activates continuous GPS tracking. Location updates are sent to the server every few seconds, allowing dispatchers to see the driver's live position on the fleet map. Tracking stops automatically when the driver taps End Trip or completes all stops.
Mileage logging
GPS points collected during a trip are used to calculate total mileage automatically. The trip distance appears on the completed trip record and feeds into the mileage reports.
Auto-swap notification when marking full
When a driver scans a QR code or manually marks a dumpster as Full, the system checks if an available dumpster of the same size can be swapped in. If one is available, the driver receives an on-screen notification offering to schedule the swap automatically.
Generate a portal link
Open a customer's detail panel and click Send Portal Link. The customer receives an email with a unique link to their portal.
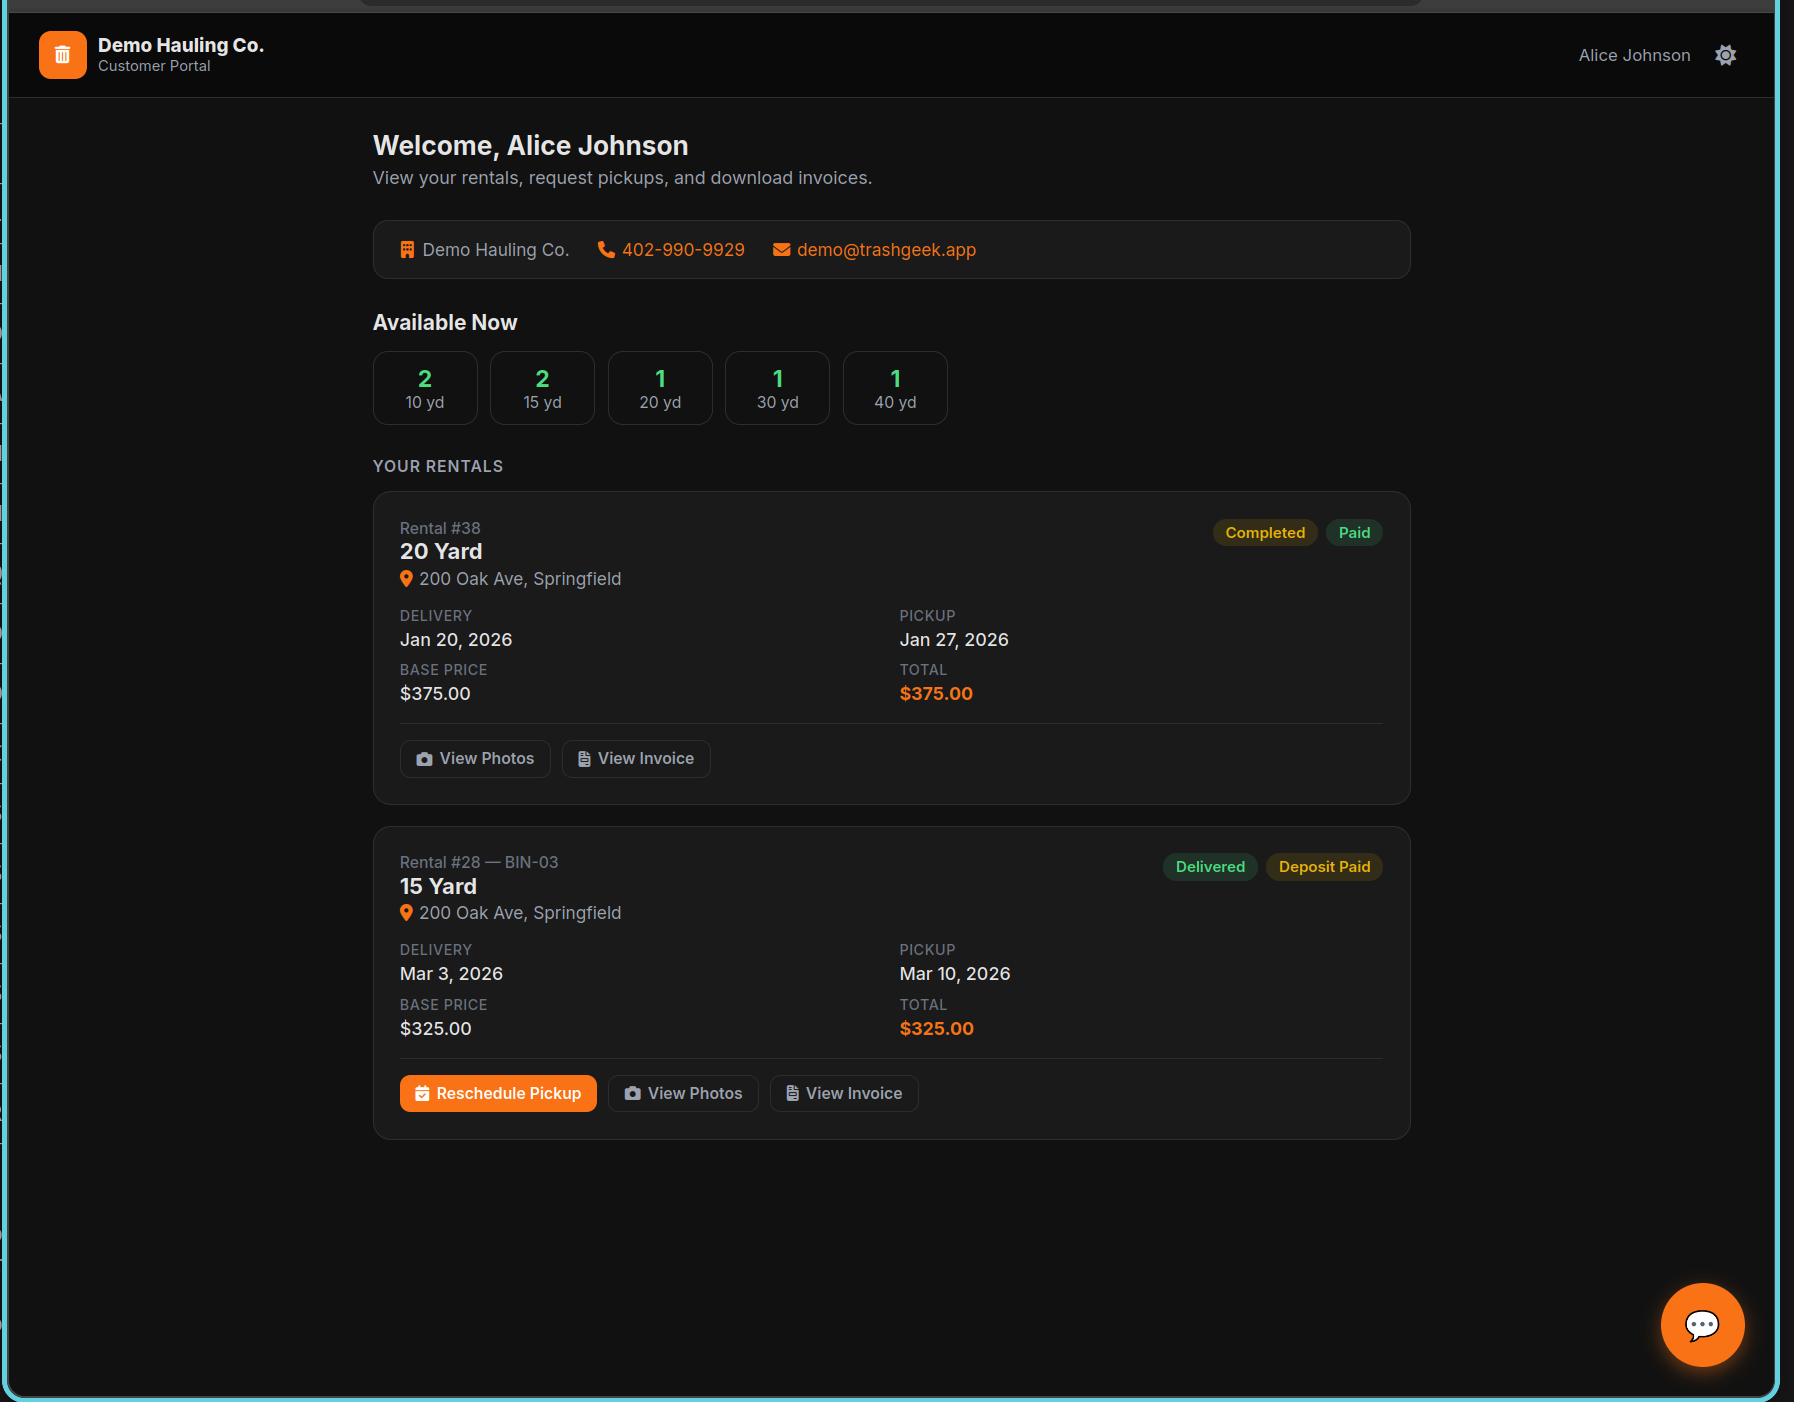
What customers can do
Customers can view their active rentals, see delivery/pickup dates, view proof-of-delivery photos, download invoices, request early pickups, and chat with your team.
Customer receives a portal link
When you send a portal link from the customer detail panel, the customer receives an email with a unique, secure link. No login or password is required — the link contains a JWT token that authenticates them automatically.
Viewing and paying invoices
In the portal, customers see their active rentals and any outstanding invoices. Each invoice shows the amount due, line items, and a Pay Now button. Clicking it opens a Stripe-hosted checkout page where they can pay by credit card or ACH.
Scheduling with time windows
When requesting a pickup or delivery through the portal, customers can select a preferred time window (e.g., Morning 8–12, Afternoon 12–5). This preference is attached to the appointment and visible to dispatchers on the board.
Payment confirmation
After a successful payment, the invoice is automatically marked as paid in your dashboard. Both the customer and your team receive a confirmation email. The payment appears in your Stripe dashboard and revenue reports.
Go to the Pricing page
Click Pricing in the sidebar. You'll see rate cards for each dumpster size with columns for daily, weekend, week, and extended rates.
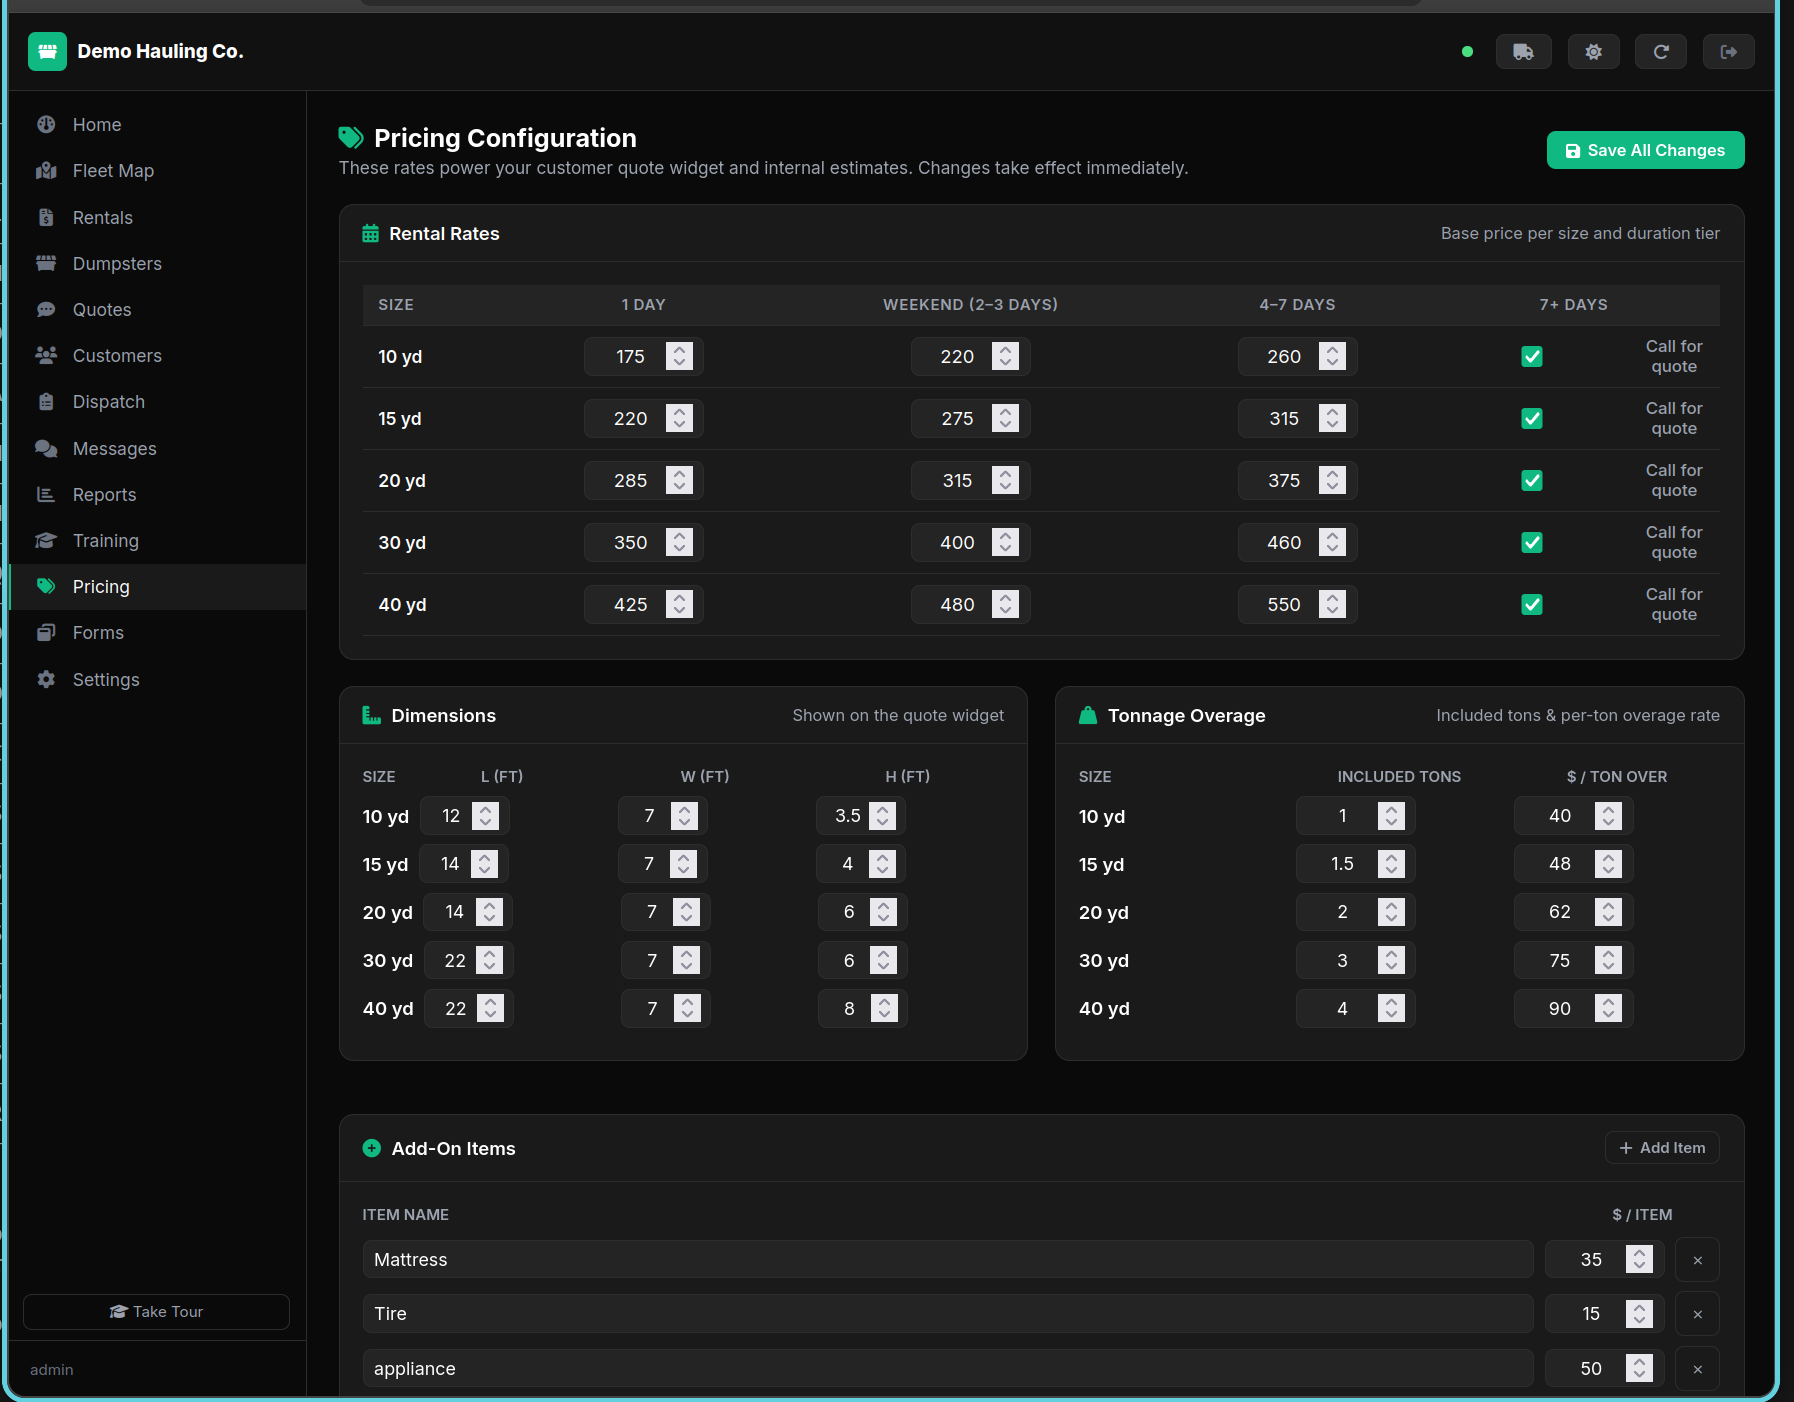
Edit rates and add-ons
Click any rate to edit it inline. Scroll down to set included tonnage and per-ton overage rates for each dumpster size, configure add-on fees (mattress, tire, etc.), and mileage charges. Changes save automatically.
Set up seasonal pricing
Create seasonal rules to automatically adjust rates during peak periods. Rules can apply percentage or fixed adjustments to specific sizes or all sizes.
Open Settings and find Stripe Connect
Scroll to the Stripe Connect card in Settings. Click Connect Stripe Account. You'll be redirected to Stripe to complete onboarding.
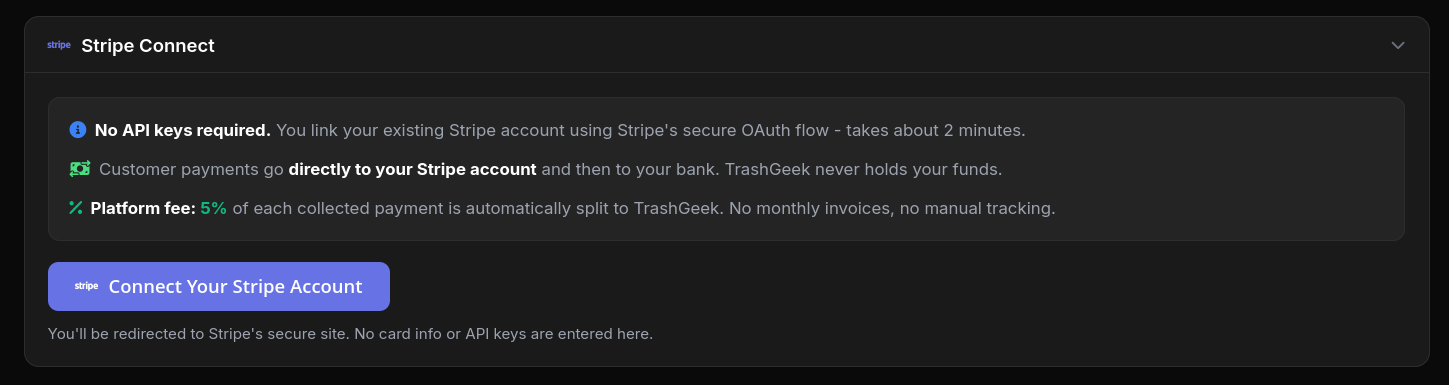
Complete Stripe onboarding
Follow Stripe's steps to verify your identity and connect your bank account. This takes about 2 minutes. No API keys are needed - it's all handled via secure OAuth.
Generate payment links
Once connected, you can generate Stripe Payment Links on any rental. Click the $ button on a rental card to create a link and send it to the customer.
Get your embed code
Go to Settings > Embed Codes. You'll see pre-filled snippets for the Quote, Cleanup, and Contact forms. Click Copy on any snippet.
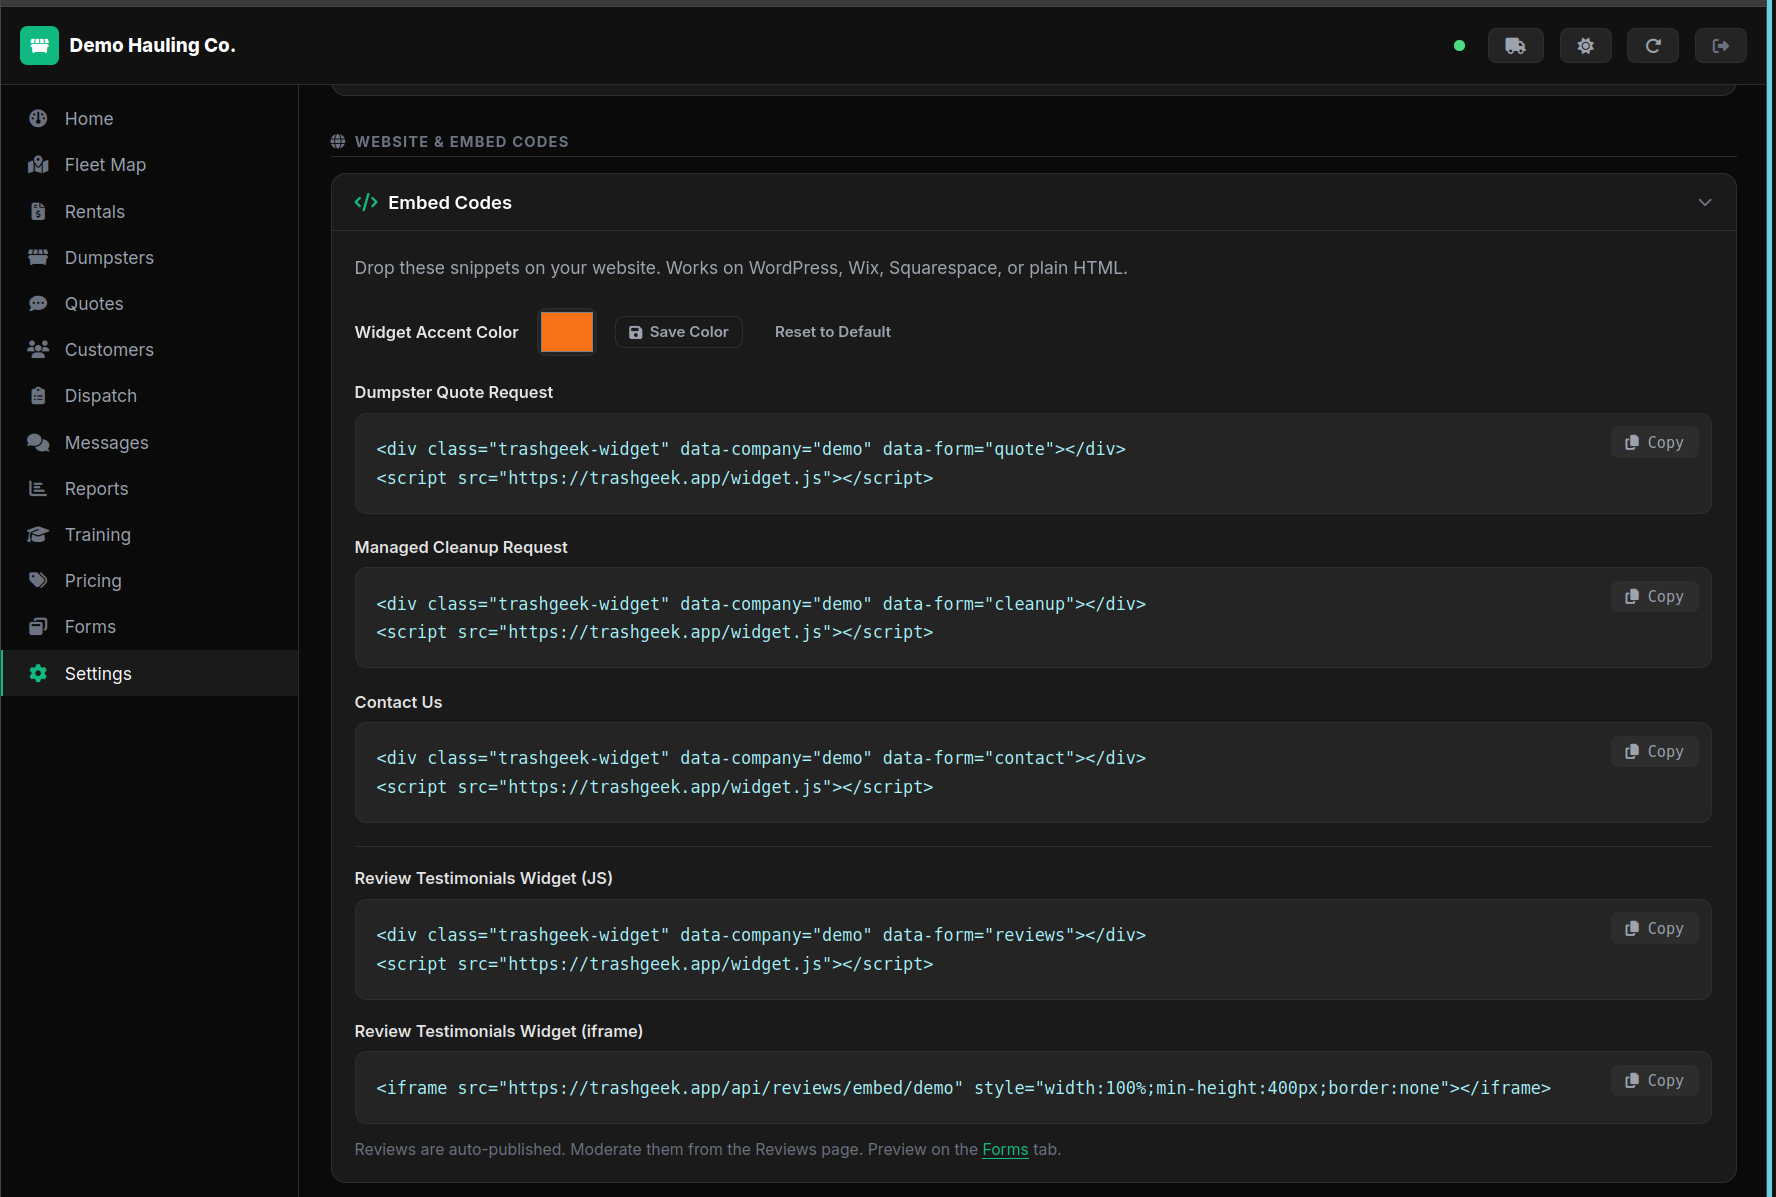
Paste on your website
Paste the two lines of HTML anywhere on your website - WordPress, Wix, Squarespace, or plain HTML. The widget renders automatically with your live pricing.
Receive quote requests
When a customer submits the form, the quote appears in your Quotes tab instantly. You get an email alert and a real-time notification in the dashboard.
Create an invoice
Open a rental's detail panel and click Create Invoice. The invoice auto-populates with the rental's line items: base rate, delivery/pickup fees, overage charges, and any add-ons. Review the totals and click Save.
Send to the customer
Click Send Invoice to email the invoice directly to the customer. The email includes a summary of charges and a Pay Now link powered by Stripe. You can also copy the payment link to send via text or chat.
Track payment status
Invoices show one of three statuses: Draft (not yet sent), Sent (awaiting payment), or Paid (payment received). Filter the invoice list by status to quickly see outstanding balances. Overdue invoices are highlighted automatically.
Set up recurring contracts
For long-term customers, create a recurring contract on the customer record. Set the billing day of the month, contract amount, and term length. The system automatically generates and sends invoices on the billing day each month.
Open Settings > Integrations
Scroll to the accounting integration you want (QuickBooks, Xero, FreshBooks, or Invoice Ninja). Click Connect to start the OAuth flow (or enter your API key for Invoice Ninja).
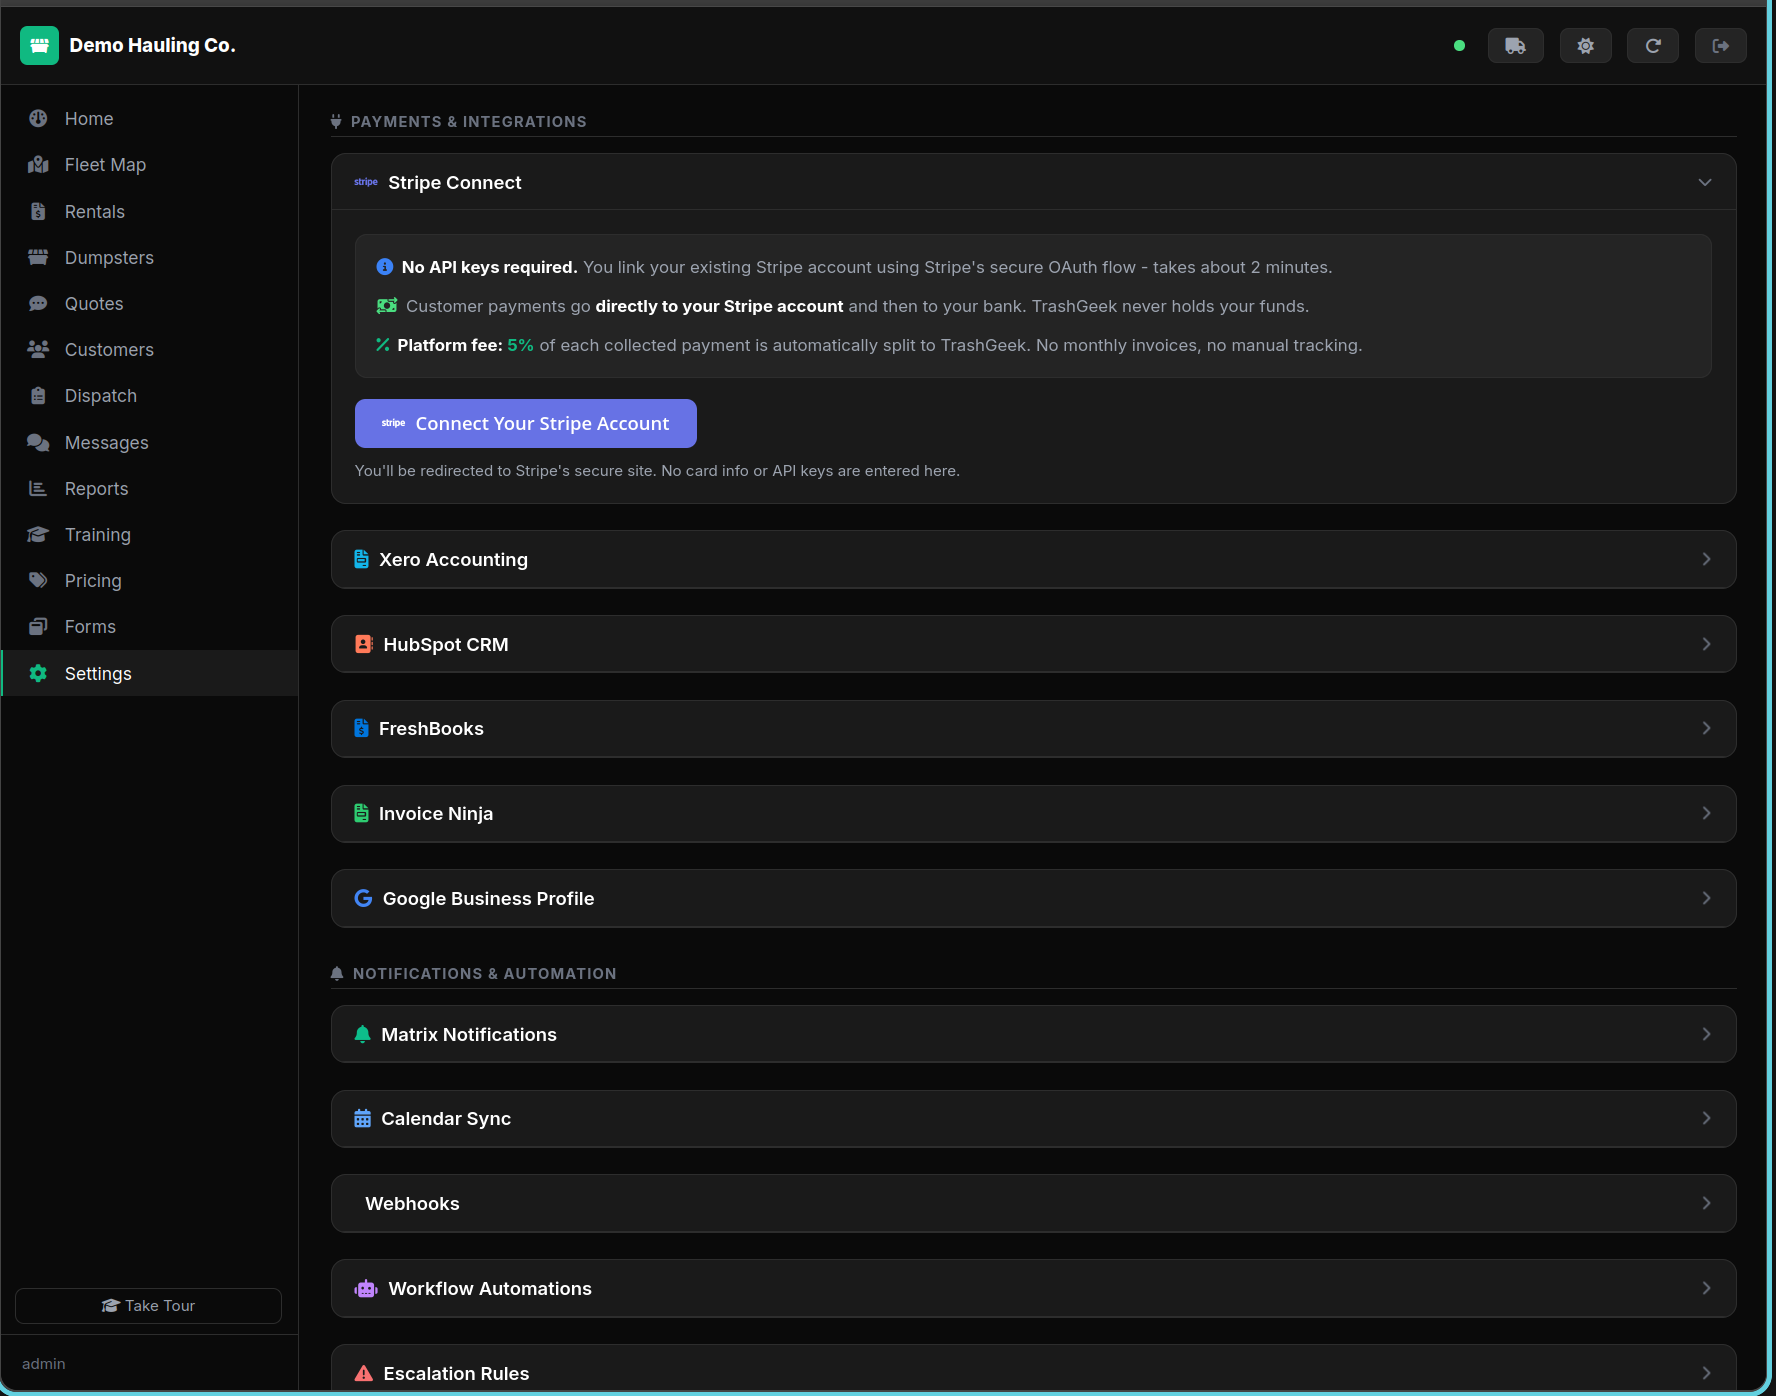
Authorize access
You'll be redirected to sign in to your accounting service and grant TrashGeek permission to create invoices. No API keys are required.
Export invoices
Select one or more completed rentals and click Export. Invoices are created in your accounting software with customer name, rental details, and line items.
Connect HubSpot
Go to Settings > HubSpot and click Connect. Authorize TrashGeek to access your HubSpot account.
Sync contacts and deals
Click Sync Contacts to push your customer database to HubSpot as contacts. Click Sync Deals to push rentals as deals in your pipeline.
Generate a webhook secret
Go to Settings > IoT Tracking and click Configure. A unique HMAC-SHA256 signing key is generated. Copy it to your IoT platform.
Configure your IoT platform
Point your IoT device webhook to /api/integrations/iot/webhook. Sign payloads with the HMAC secret. Events include GPS, weight, temperature, and alerts.
View IoT data
IoT events appear on dumpster detail cards and in the IoT Events section. Weight alerts can auto-mark bins as full for pickup.
Find a pending quote
Go to the Quotes tab and locate the quote you want to follow up on.
Click the follow-up icon
Click the follow-up icon on the quote card to open the follow-up dialog.
Choose channel and send
Select your follow-up channel: Email, SMS, or Both. Write a custom message, then click Send. The quote is automatically marked as "contacted".
Create an escalation rule
Go to the Escalations section in the dashboard. Click Add Rule. Choose a condition (e.g., "overdue by 3 days") and an action (send SMS, send email, or notify Matrix).
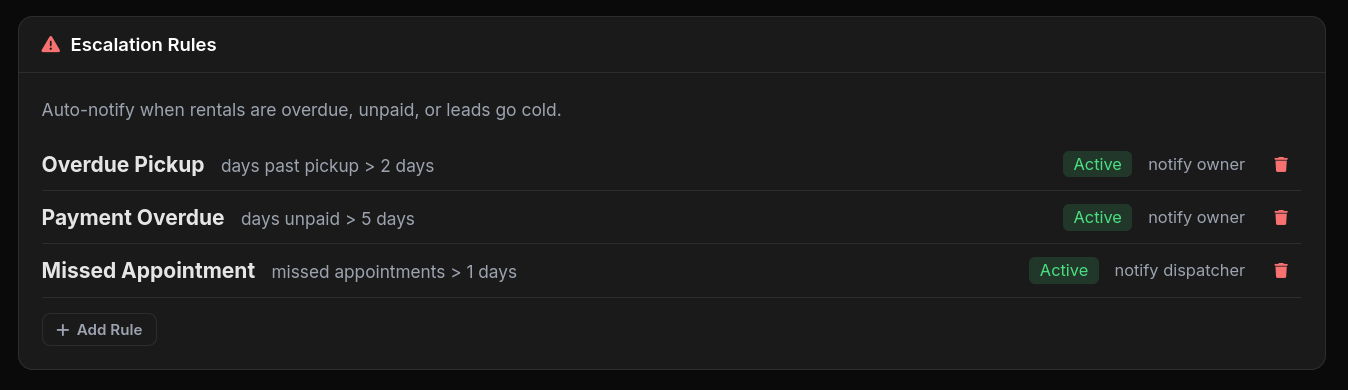
Rules run automatically
The background cron evaluates escalation rules periodically. When a rental matches a condition, the configured action fires automatically. No manual intervention needed.
Create a workflow
Define a trigger event (e.g., "rental_created", "appointment_completed") and add steps that execute in sequence: send email, send SMS, update status, notify webhook, etc.
Example: Post-delivery follow-up
Trigger: "appointment_completed" where type is "delivery". Steps: (1) Wait 2 hours, (2) Send SMS "Your dumpster has been delivered!", (3) Send review request after 7 days.
Configure review settings
Go to Settings and find the Post-Pickup Reviews card. Toggle review emails on/off, set the delay (1–2 hours recommended), and configure your coupon and referral amounts.
Add your logo & social links
In Settings, upload your Company Logo (available on all plans) and add your Social Media links (Facebook, Instagram, TikTok, Google, Yelp). These appear in review emails.
How it works
When a dumpster is picked up, a review email is automatically scheduled (default: 2 hours after pickup). The email includes your logo, social links, and incentives for the customer to leave a review and refer friends.
Customer experience
Customers click the review link, rate 1–5 stars, and leave a comment. After submitting, they receive a discount code for their next rental and a referral link to share with friends.
Embed testimonials on your website
In Settings, find the Review Testimonials Widget card. Copy the iframe embed code and paste it on your website. Published reviews with comments are displayed in a branded widget.
Create a new campaign
Go to the Campaigns section in the sidebar. Click New Campaign. Enter a campaign name, subject line, and compose your email body. You can use merge tags like {{first_name}} and {{company_name}} to personalize each message.
Target your audience
Choose which customers receive the campaign. Filter by rental status (active, completed, overdue), last rental date, dumpster size, or location. You can also target all customers or select specific ones manually.
Preview recipients
Before sending, click Preview Recipients to see exactly who will receive the email and how many customers match your filters. Review the list and remove any recipients you want to exclude.
Send and track stats
Click Send Campaign to queue delivery. Emails are sent in batches to avoid spam filters. After sending, the campaign detail page shows delivery stats: total sent, opened, clicked, and bounced.
Find at-risk customers
Go to the Customers page and look for the At Risk badge on customer cards. These are customers who haven't had a rental in longer than your configured inactivity threshold. You can also filter the customer list to show only at-risk customers.
Send a winback email
Click the Winback button on an at-risk customer's card. This sends a personalized re-engagement email with your company branding, offering them an incentive to book again. You can customize the winback email template in Settings.
Configure the inactivity threshold
Go to Settings and find the Churn Alerts card. Set the number of days of inactivity before a customer is flagged as at-risk (default: 90 days). You can also enable automatic winback emails so the system sends them without manual intervention.
Select rentals
On the Rentals page, check the boxes next to the rentals you want to act on. The bulk action bar appears at the top.
Choose an action
Available actions: Approve (set to confirmed), Invoice (generate Stripe payment links), SMS (send a message to all customers), and Price Adjust (apply percentage or fixed amount change).
Open Reports
Click Reports in the sidebar (opens reports.html). Choose a report type: Revenue, Rentals, Utilization, Customers, Overdue, Aging, Quotes, Heatmap, Margins, Forecast, or CLV Cohorts.
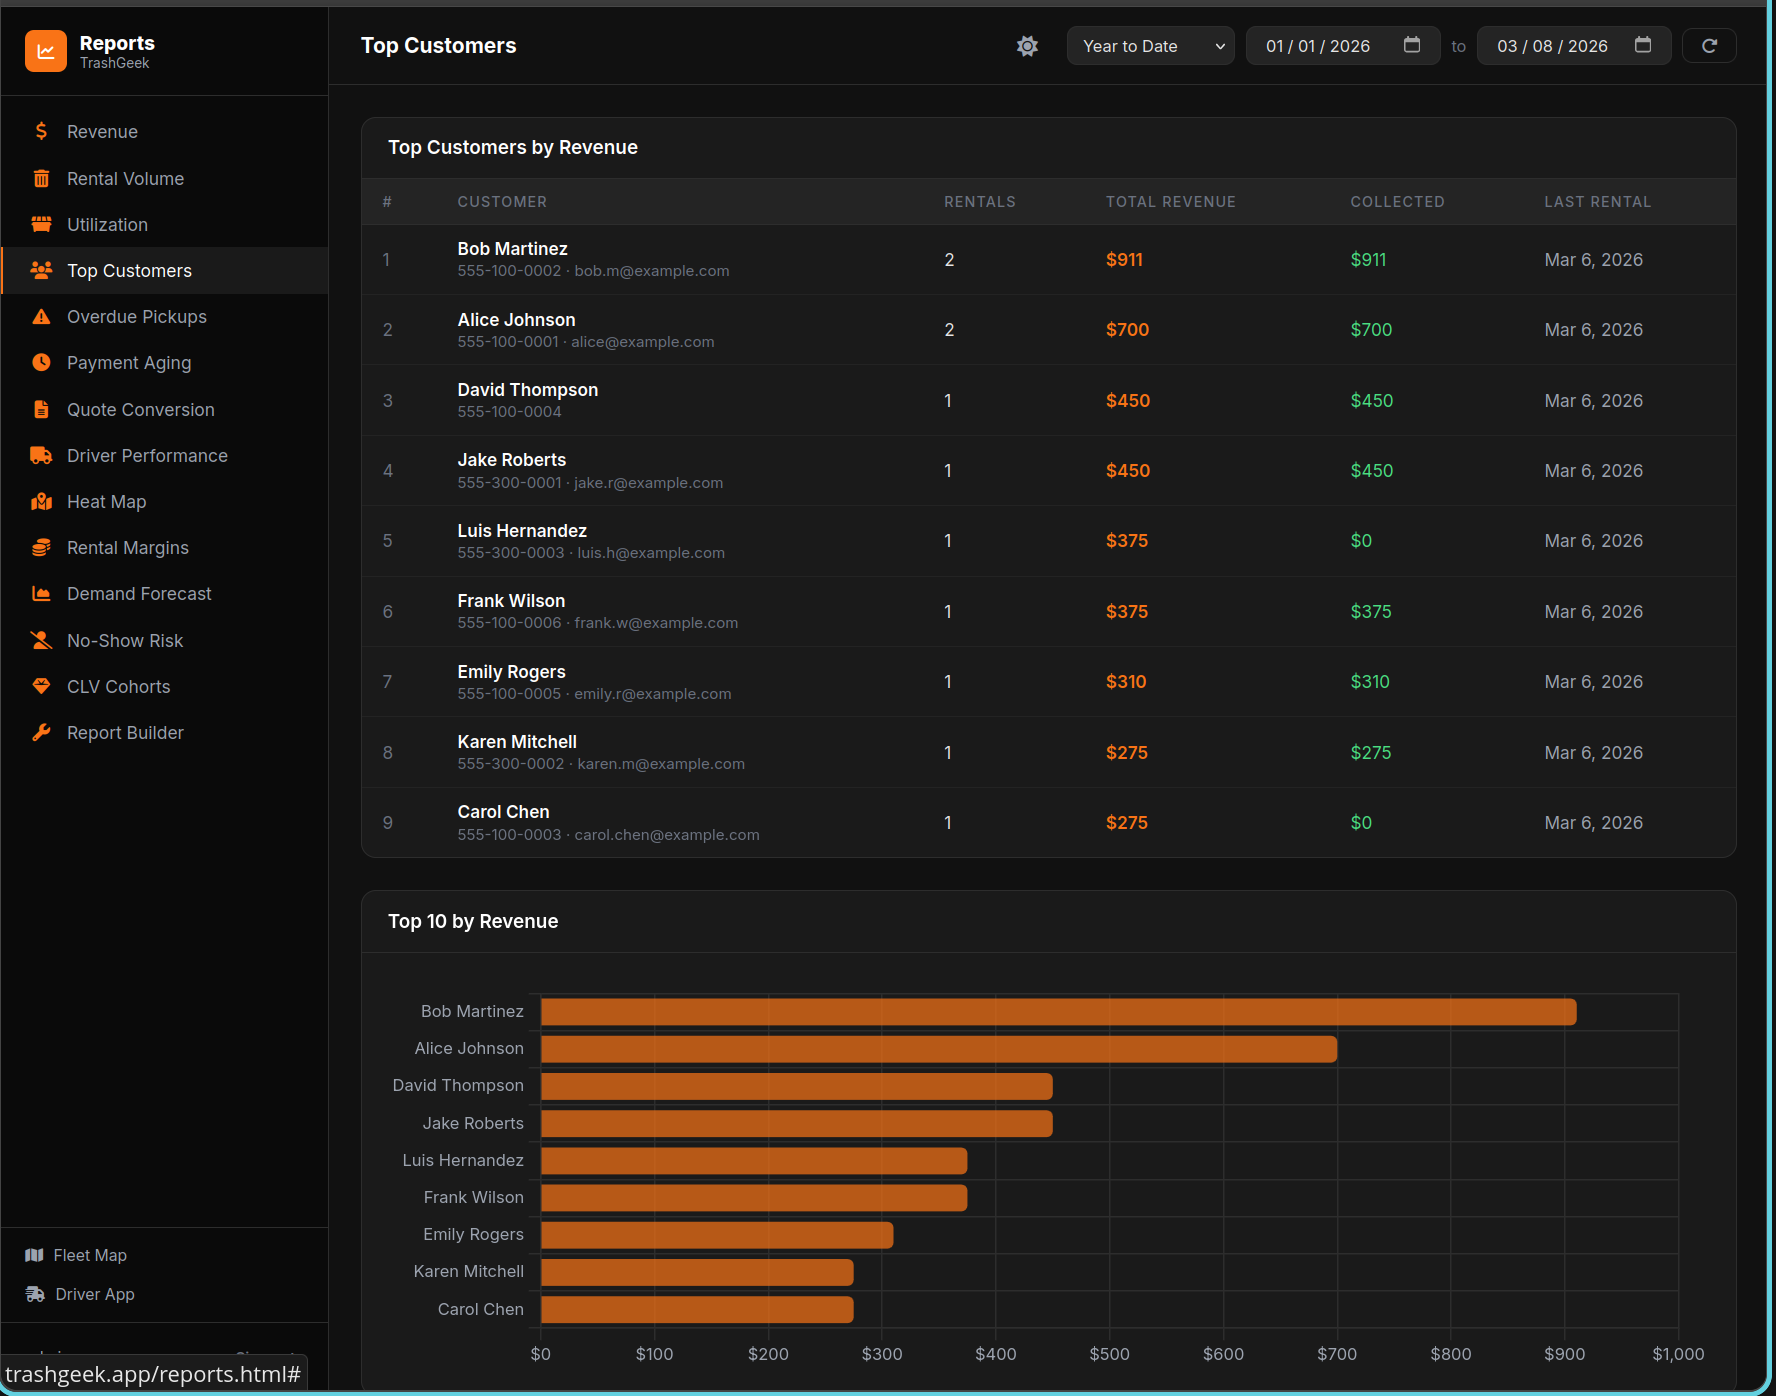
Filter and export
Set date ranges and grouping (daily or monthly). Save frequently-used report configs for quick access. Export any report as CSV for further analysis.
Driver picks up dumpster
When a driver completes a pickup, a scale weight prompt appears in the Driver App.
Enter weight in tons
The driver enters the dump scale weight in tons. The system records it on the rental.
Auto-calculate overage
The system compares the recorded weight against the included tonnage for that dumpster size. If the weight exceeds the included amount, overage charges are automatically calculated using your per-ton overage rate.
View in reports
Overage charges appear on the rental detail and in your revenue reports. Use the Reports page to track tonnage trends across your fleet.
Find the full dumpster
When a customer's dumpster fills up before their rental ends, open the rental detail panel from the Rentals page or click the dumpster card on the Dumpsters page.
Click "Dump & Return"
The purple Dump & Return button appears on any dumpster that's deployed or marked full with an active rental. Click it to open the cycling modal.
Enter weight and fees
Optionally enter the dump scale weight (tons) — it accumulates across cycles for accurate overage billing. You can also add a dump fee for the extra haul charge.
Dumpster returns to service
The system creates pickup and re-delivery appointments, resets the dumpster to "deployed" status, and logs the cycle in the rental's internal notes. The rental continues uninterrupted.
Find the date range dropdown
On the Dashboard (Home) page, look for the dropdown selector near the top stats grid. It defaults to "All Time".
Select a time window
Choose from 30 days, 60 days, 90 days, 180 days, This Quarter, 1 Year, or All Time. Stats update immediately to show only rentals and revenue within that window.
Open the command palette
Press Ctrl+K (or Cmd+K on Mac) from anywhere in the dashboard to open the search overlay.
Type your search query
Start typing to search across rentals, dumpsters, customers, quotes, and appointments. Results update as you type.
Navigate to a result
Click a result to jump directly to that item. Press Escape to close the palette without navigating.
Open the driver app
Open the Driver App on your phone or browser. The language picker is available on both the login screen and the top bar after login.
Select your language
Tap the language picker and choose from English, Spanish, or French. The interface updates instantly.
Preference saved automatically
Your language preference is saved and will be used the next time you open the app. Company admins can also set a default language for all drivers from the Settings page.
Access the Community
Click the Community link in your dashboard navigation bar, or go directly to the forum or equipment classifieds. You can browse listings and forum threads without an account.
Create an Account
Click Sign In → Sign up free. Fill out your details and verify your email. Your profile has a completion progress bar — fill it out to build trust with other members.
Browse & Post Listings
Use the Browse tab to search equipment by category, condition, price range, and state. Click New Listing from the user menu to post your own. Featured listings (gold border) appear first in search results.
Use the Forum & Knowledge Base
The Forum tab has category-based discussions. The KB (Knowledge Base) tab shows pinned guides and FAQs. Start new threads or reply to existing ones. You'll receive email notifications when someone replies to your thread.
Enable Overflow
Go to Settings → Overflow Network in your dashboard and toggle overflow On. This allows your company to send and receive overflow quotes from nearby operators.
Set Your Radius & Referral Percentage
Configure your service radius (in miles) to control how far overflow quotes travel. Set your referral percentage (default 10%) — this is the fee you earn when a partner completes a job you referred, or the fee you pay when you accept someone else's overflow.
Understand Overflow Quotes
When your fleet is full and a new quote comes in, it is automatically forwarded to partner operators within your radius. Partners see these quotes in their Overflow tab and can Accept or Decline with one click. Accepting creates a rental on the partner's account.
Track Earnings
Visit Settings → Overflow Referrals to see a ledger of referral fees earned and owed. Each entry shows the job, partner company, amount, and payout status. Fees are calculated automatically when the referred job is completed.
Create a Job Posting
Go to Settings → Job Board and click New Posting. Fill in the job title, description, location, employment type (full-time, part-time, contract), whether a CDL is required, and pay range. Your company name and logo are included automatically.
Manage Applications
When a job seeker applies, you receive an email notification. View all applications from the Job Board tab. Each application shows the applicant's name, email, phone, message, and optional resume link. Update the status as you work through candidates: New → Reviewed → Contacted → Hired or Rejected.
How Job Seekers Find Your Listing
Active job postings appear on the public /jobs page. Seekers can filter by location, job type, and CDL requirement. Your listing includes your company name, location, and logo. Closed or expired postings are automatically hidden from search results.
Install the App
Your company admin will provide the APK file or a link to the Google Play Store listing. On Android, you may need to enable Install from Unknown Sources in Settings if installing from an APK. Once installed, the TrashGeek Driver icon appears in your app drawer.
Grant Permissions
On first launch, the app will request permissions for Location (including background location for trip tracking), Camera (for proof photos and QR scanning), and Notifications (for dispatch alerts). Tap Allow for each — these are required for full functionality.
Log In and Start Driving
Log in with your company slug, username, and password — same credentials as the web driver app. The native app provides the same stop cards, trip tracking, QR scanning, and proof photos, but with native performance and real-time push notifications when new stops are assigned.
Push Notifications
The native app receives push notifications for new stop assignments, schedule changes, and dispatch alerts. Tap any notification to jump directly to the relevant stop card. Notifications work even when the app is in the background.
Open the Live page
In the super-admin dashboard, click the Live tab. This page provides a real-time overview of everything happening on the platform, with counters that refresh automatically every 5 seconds.
Watch the activity feed
The activity feed shows a live stream of platform events: new rentals, incoming quotes, customer searches, and company signups. Each entry is timestamped and linked to the relevant company or record.
Explore platform analytics
Use the time range selector (24h, 7d, 30d) to view platform analytics across different periods. See a ranking of the most active companies and daily charts for rentals and quotes to spot trends and growth patterns.
Automatic IP banning
TrashGeek automatically detects IPs making excessive failed requests — brute-force login attempts, repeated invalid endpoints, or suspicious scanning behavior. Offending IPs are temporarily blocked to protect the platform.
Bot honeypot traps
Common attack paths like /wp-admin, /.env, and /phpinfo are configured as honeypot traps. Any IP that hits these paths is immediately flagged as a bot and blocked, stopping automated scanners before they can probe further.
Security dashboard
Open the Security page in the super-admin dashboard to view all currently banned IPs and a log of suspicious activity. You can see when each ban was applied, the reason for the ban, and the ban expiry time.
Manual ban and unban controls
Use the manual controls on the Security page to ban specific IPs or unban IPs that were incorrectly flagged. Matrix notifications alert you in real time whenever a security event occurs, so you can respond quickly to threats.